In one of my previous blogpost, we learned how to send a weekly report mail with data of a SharePoint list.
The table was not so beautiful. There wasn’t even a border to separate columns or rows.
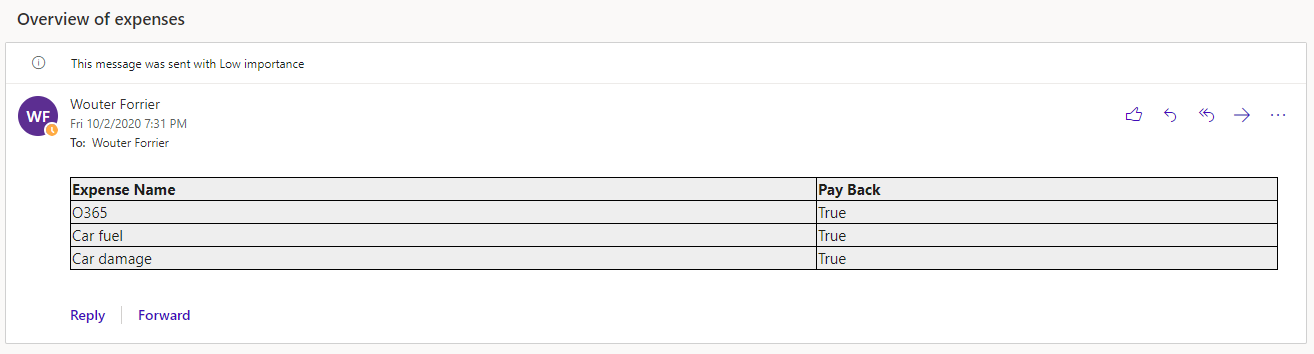
We want to achieve a styled table:

We have two ways to add styling to the table. The first way is the most simple one to achieve a complete styled table with CSS. The second way is easy as well, but just adds a border without using CSS.
We created a HTML table, if you want to know more about that, check how to generate a HTML table with Power Automate.

Easiest way of adding CSS to the HTML table
In the next action, we will add styling to the table.
Just add a “Compose” action, write the CSS and add the output of the “Create HTML table” action below the CSS.

You can change the CSS as much as you want.
<style>
table {
  border: 1px solid black;
  background-color: #EEEEEE;
  width: 100%;
  text-align: left;
  border-collapse: collapse;
}

table th {
  border: 1px solid black;
  border-collapse: collapse;
}
table td {
  border: 1px solid black;
  border-collapse: collapse;
}
</style>
If you first want to write the CSS code in an online editor, for example W3Schools Tryit Editor, run your flow, and copy the HTML out of the “Create HTML table” action output.
This has the advantage that you don’t have to run the flow each time to see the result of your CSS changes.
To copy the HTML, click “Show raw outputs”:

Copy the HTML:

Paste it into the W3Schools Online Code Editor, paste your CSS above the HTML.

Click the green “Run” button and see the styled table.
Styling tables with a HTML border tag
Are you happy with below result? Just an easy HTML table, than these steps are for you.

Add a Compose action with a formula instead of writing CSS. This formula just replaces the table tag with a new table tag that has a border.

replace(body('Create_HTML_table'),'<table>','<table border="1">')
Finishing the flow, sending the HTML table
When you’re finished with styling your table, make sure to add the correct output to the “Send an email” action.

Do you want to learn more about styling tables, check the CSS Tables documentation of W3Schools.
Do you want to deep dive into tables, read A Complete Guide to the Table Element on CSS-Tricks.com.