Since you can make Power Apps in Microsoft Teams, you can also use a light version of CDS for free.
With this light version of CDS, we can use a relational database that supports complex relationships between entities (tables). With SharePoint as a data layer, we can only do lookups to create 1-1 or 1-N relationships.
Now that we have CDS in project Oakdale, we can create many to many or M-N relationships. Power Apps does not support many to many relationships yet in forms in your Power App, but there’s a small piece of code that helps you achieve what you want.
The in forms part in the previous sentence is important because you can already use the relate() and unrelate() functions. Just when using forms you need to do something extra to create the many-to-many relationship.
First step is to add the Power Apps app to Teams:

Pin it if you don’t want to lose the icon:

Click “Create an app”:

Select a team to add it to and click “Create”:

The Power App is created, next step is to create the data layer. We use the light CDS provided by project Oakdale which is new in Teams.
Click on the data icon in the menu:

Create two entities in your data layer, for example:
- Company
- Inspection
Create these two tables by clicking “Add data”:

Don’t create the relationships yet between the tables. You can only define lookups here, no complex relationships.
Power Apps will automatically rename your entity to a plural name. For company, you can define the plural “Companies” yourself in the advanced settings when creating the table.


An inspection can be linked to multiple companies. A company can be linked to many inspections. We have a many-to-many relationship.
Add some dummy data in your tables, like I did. (See screenshots)
It’s time to create the relationship. You cannot do this (yet) in your Power App itself. Save your Power App.

After saving, click “Build” on top:

Click “See all”:

Click “Tables” and click on your table “Inspection”:

Click on “Relationships”:

Click on “Add relationships” and select “Many-to-many”:

Select the entity “Company”:

Click “Done”.
You have just created a many-to-many relationship between your Company and Inspection table.
Go back to “Apps”, select your app and click “Edit”:

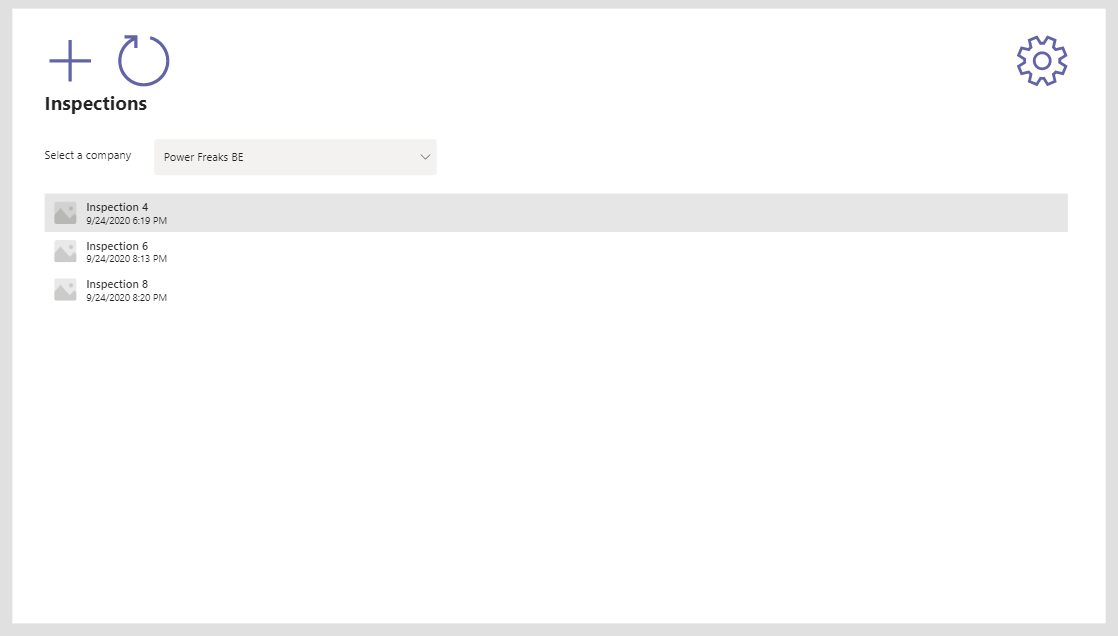
What we want to achieve is creating an app that can
- Show us an overview of all inspections, filtered by company
- Create a new inspection that can be linked to multiple companies
The end result will look like this:

Let’s start with creating this screen. I assume you already have some experience with Power Apps, so you can create the basic things on your own. I will share the formulas of the combobox and the gallery with you:
Combobox:

Gallery:
“cmbCompany” in the formula is the name of the combobox in the previous screenshot.
You will not see any data yet in your gallery as we have not linked yet any inspections with a company. This will be for the next screen.

We created the overview screen, but do not see any data yet. This is because we haven’t created a screen yet to create a new inspection.
The screen we want to create looks like below.

To achieve this, we will need to some special things as Power Apps does not support complex relationships yet in forms.
The first step is to create a new screen in your Power App. Create a “Blank” screen.

Add an “Edit form” to your screen:

Click “Connect to data”. Add “Inspections” as data source:

Right now, we only see a “Name” field. We also want to see a field to select companies. Click “Edit fields” and “Add field”.

Select “Companies” and click “Add”:

You have an error now, because Power Apps does not support this yet. But we can fix this.

First, set the “DefaultMode” property of “Form1” to “New”:

Select the data card value field and unlock it:

Change the “Items” propery to “Companies”:

After that, select the whole data card and change the “DisplayMode” property to “Edit”:

Than, clear the “Update” property:

Normally, after doing this, we just add a submit button, but we need to do something extra to save the many-to-many relationship.
Add a submit button and change the “OnSelect” property to following code:

ClearCollect(colCompanies,DataCardValue2.SelectedItems);
SubmitForm(Form1);Set(newInspection,Form1.LastSubmit);
ForAll(colCompanies,Relate(newInspection.Companies,ThisRecord));
NewForm(Form1)
The “ClearCollect” function gets the selected companies for the many-to-many relationship and puts it in a collection.
The “SubmitForm” function will save the new “Inspection” record in CDS. Because we cleared the “Update” property, we will not get an error for the “Companies” field.
The “Set” function saves the newly created “Company” record to a variable which we will use in the “Relate” function.
Finally, we loop through each record in the “colCompanies” collection and link each record with the “Inspection” by using the “Relate” function.
As latest step, we clear the form so that a new inspection can be created.
Now that we created this screen, we are able to create an inspection that can be linked to multiple companies.
To be sure that your newly created inspection appears on the overview screen, it can be good that you do a refresh of the table by putting the “Refresh” function in the “OnVisible” property when your screen is loaded.
